Sync Hacks is a column dedicated to exploring new applications for Resilio Sync (formerly BitTorrent Sync), as built by users like you. Resilio Sync is a free, unlimited, secure file-syncing app. (And now, it’s 2X faster.) If you’ve got an epic Sync idea, use-case or how-to, shoot us an email at team[at]resilio.com.
In this week’s Sync Hacks: Ben Milman, Technical Marketing Specialist at iXsystems, Inc, shows us how to simply set up FreeNAS with Resilio Sync. FreeNAS enables users to build network-attached-storage (NAS) on nearly any hardware platform of their choosing. We’ve come out with a tutorial on how to do this in the past, so that anyone can turn their old computers into a Network Attached Storage (NAS) device running BitTorrent Sync.
Now, thanks to community member Josh Ruehlig, there’s a FreeNAS plugin for BitTorrent Sync that simplifies the setup process and doesn’t get into any trouble after a FreeNAS update. Read on for the full tutorial (note: instructions are for FreeNAS 9.2.0 or later).
Here is what you’ll need
• An old computer with a 64 bit AMD or Intel processor (required)
• At least one hard drive in the computer containing no important data (required)
• 2GB or larger thumb drive (4GB recommended)
• At least 4GB of ram (highly recommended)
• CAT5 cable (required)
• Writable CD or DVD, CD or DVD burner, and CD or DVD drive (optional)
Installation and Initial Setup
1. Go to FreeNAS.org and get the latest version of FreeNAS in 64-bit.
2. If you have a writable CD or DVD and a CD or DVD burner as well as a CD or DVD drive that can be used with the system on which you plan to install FreeNAS, you may download the CD Installer (.iso file), burn it to disk, and use these instructions to install FreeNAS
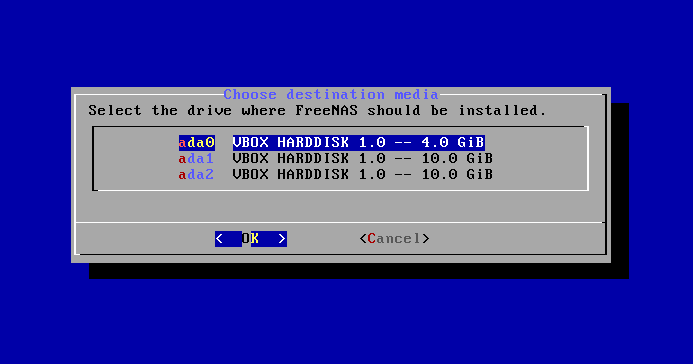
Alternatively, use the .img.xz file from the “Legacy and 32-bit Downloads” tab with these instructions: http://doc.freenas.org/index.php/Burning_an_IMG_File
3. Once you have the thumb drive created, connect the computer to your router (only an ethernet connection will work, as FreeNAS does not support wireless connections). Boot from the USB drive. Once it boots, it will give you an IP address from which to log in to the FreeNAS web UI.
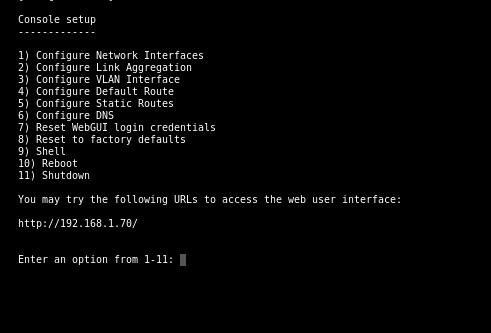
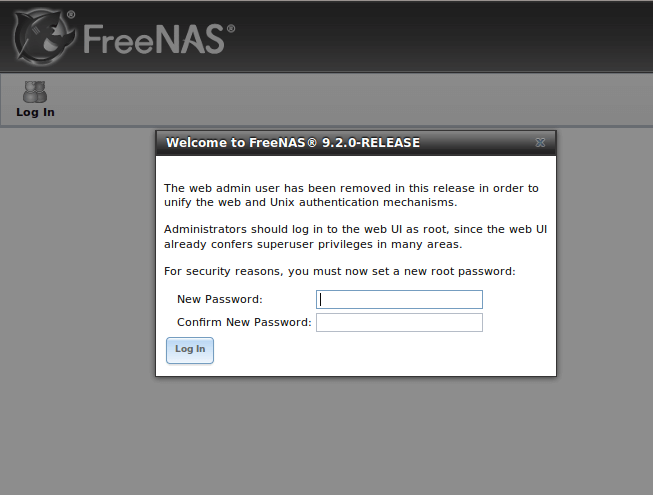
4. Go to that address from a computer on the same LAN as the FreeNAS box and you will see the FreeNAS login page, which will prompt you to make a password. Note that this password will be the root password for the entire FreeNAS install, so choose carefully!
Volume, Datasets, and Permissions
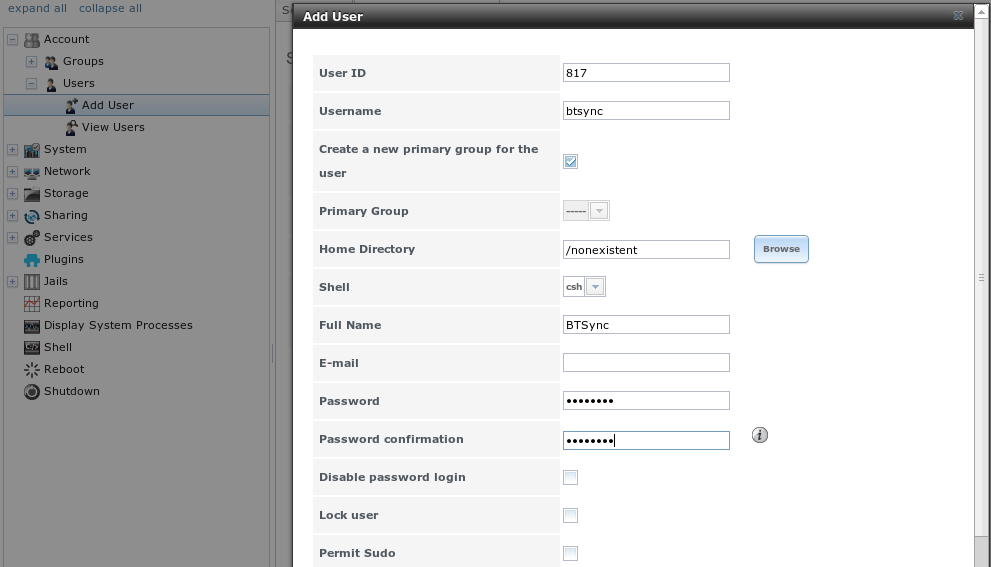
5. Now that you’re in the FreeNAS Web UI, you’ll need to create a user and group for BitTorrent Sync. In the left side menu, click the “Account” dropdown, and then “Users”. Choose “Add New User”. Create a new user named “btsync”, with the UID ‘817’. This is critical later: make absolutely certain the UID matches. Leave “Create a new primary group for this user” checked. Fill something into the Full Name field and choose a password, then click “OK” to create the user.
For reference, see http://doc.freenas.org/index.php/Users.
6. Next, click on the “Volumes” button. You’ll be on the Volumes tab. Click “ZFS Volume Manager” to bring up the dialog to create a new volume. If you don’t want to worry about the details, just name the volume, click the “+” button next to your disks to add them to the setup (it will make a recommended RAID setup based on the drives you add). If you prefer a specific RAID setup, read the ZFS Volume Manager Documentation.
7. Select the volume you just made. The fourth button from the left at the bottom of the window is the “Create Dataset” button. Click that to bring up the new dataset dialog. Create a dataset called “Jails” and another dataset called “Files” (or something else that lets you know this is the folder you’ll be syncing).
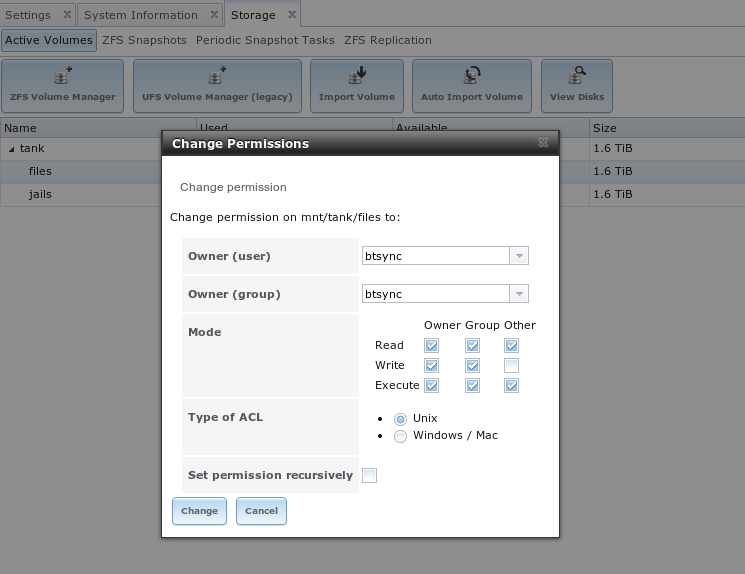
8. Click on the “Files” dataset and click “Change Permissions”, the first button on the left at the bottom of the window. This will bring up a permissions dialog. Type in “btsync” for both user and group. Give both user and group read and write permissions. This is important to make sure that BTSync can write to the folder later.
Jails and the Plugin
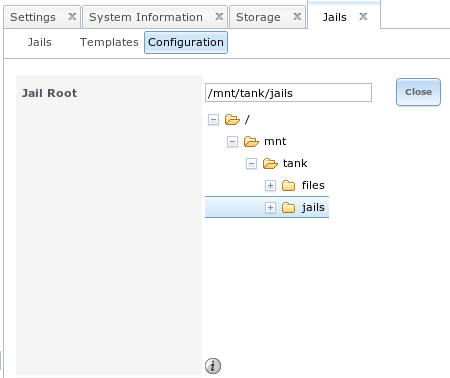
9. Now, click the “Jails” dropdown in the left-side menu and select “Configuration”. Under “Jail Root”, click browse and click through the folders until you can select the dataset you created called “Jails”. Save the settings.
10. Click the “Plugins” button at the top of the window. This will bring up a list of available plugins. Click on “btsync” and then click on “Install” at the bottom of the window. A progress bar will appear showing the progress of the plugin download, which will take a while depending on your internet connection. Once the downloads and installation complete, go to the “Installed” tab and turn on the BTSync service.
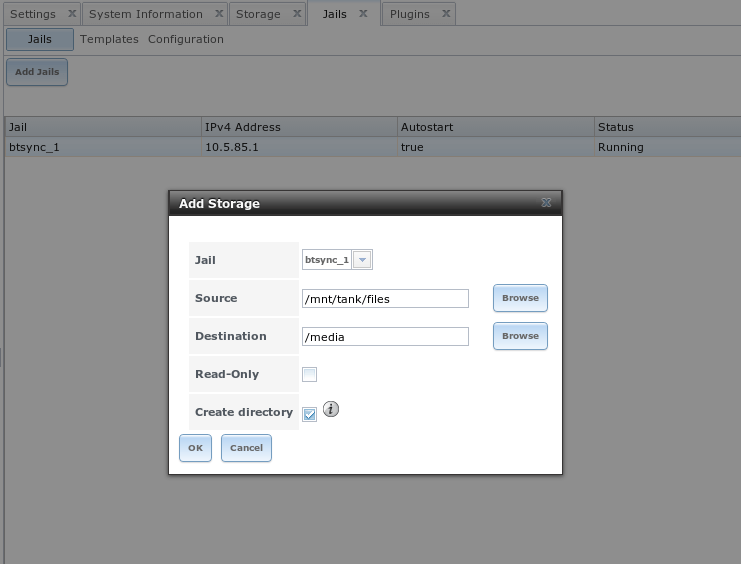
11. Return to the “Jails” tab. Click on the new jail, which will be called something like “btsync_1”. At the bottom of the window, click the second button from the left, “Add Storage”. For “Source”, click through the dropdowns and select the second dataset you made, “Files”. For “Destination”, you can either type in a custom path such as “/btsync”, or choose an existing empty folder, such as “/media”. Click OK to save the mount point.
Using Resilio Sync
12. You’re almost done! In the left side menu, click the “Plugins” dropdown. Click the “BTSync” button. The settings for BTSync will appear. You shouldn’t need to modify any of these settings, so just click the link under “here” to be taken to the BTSync Web UI. When you go to add a folder, make sure it’s the one you selected as the “Destination” when “adding storage” earlier. You can add more folders by repeating the process with making a dataset, changing the user and group permissions, and adding storage to the btsync jail.
Conclusion
You now have BitTorrent Sync working in FreeNAS. For a video walkthrough of all this, have a look below. Thanks to Josh Ruehlig for packaging BitTorrent Sync in a FreeNAS plugin and iXsystems for sponsoring FreeNAS.
To contact the author of this tutorial, email ben@ixsystems.com.
Watch full tutorial on Youtube: https://www.youtube.com/watch?v=9sb_9283BkA
Ben Milman (@bpmilman) is tech geek who loves promoting open source and free culture technology. He lives and works in Silicon Valley, promoting FreeBSD and FreeBSD-based software like FreeNAS for iXsystems, Inc.